How To Make A Whiteboard Calendar
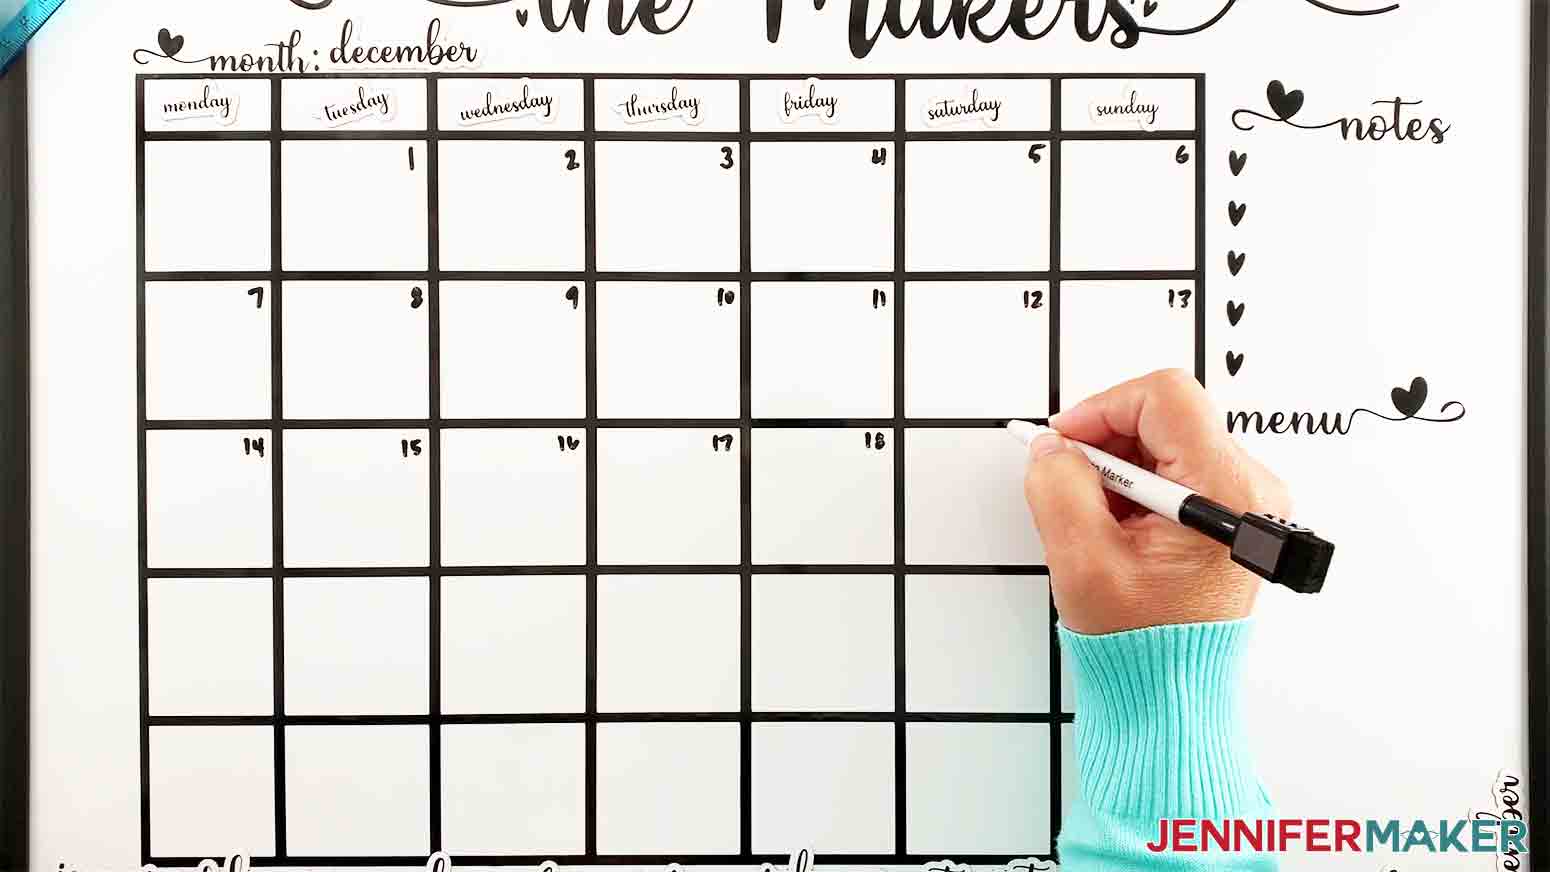
How To Make A Whiteboard Calendar - Attach the whiteboard surface to the calendar base using a strong adhesive or screws. This video tutorial will show you how to create a personalised whiteboard calendar using silhouette studio from how to create your file to how to piece your project together. Some calendars give you the week starting with sunday, some starting monday and so on. With appointments, meetings, and different happenings, it's so helpful to have one spot that everyone can check so we know what everyone else has planned. I like to have my weekend front and centre for me to see and then the rest of the week can appear in its. The border is polished for a premium and delicate touch. This tutorial shows you how to make. Use it for your editorial calendar or for your family's schedule. And it comes off easily, too! The first thing you want to do is cut a piece of vinyl. Use it for your editorial calendar or for your family's schedule. The first step is deciding how many weeks you want to display and whether or not you want to display the month. This tutorial shows you how to make. Personally, i found myself relying on the app more than the digital calendar itself. Make sure it’s visible and clear so you can easily reference it. Turn a regular dry erase board into your own personal diy whiteboard calendar and planner! You can customize it however you want, from choosing different images or designs to putting together a unique color palette for each month on your calendar board! Get the free 2021 calendar:. A whiteboard calendar isn’t just about jotting down tasks and deadlines. This diy whiteboard couldn’t be easier to make. Want a custom dry erase calendar? Cut the plywood or mdf board to the desired size for your calendar. Doodles and color inspired by @my.life.in.a.bullet link to the measurments: Hang the calendar on your wall in a home office or in the kitchen where busy family members can see it. And it comes off easily, too! Our decorative dry erase calendar board uses a durable reinforced wood frame. All you do is design a perpetual calendar, frame one you already have or print the template that we used (which you can download here ) and then stick it in in a frame. A whiteboard calendar isn’t just about jotting down tasks and deadlines. And it comes. Doodles and color inspired by @my.life.in.a.bullet link to the measurments: Make one for your family and give one as a gift! This tutorial shows you how to make. The first step is deciding how many weeks you want to display and whether or not you want to display the month. The first thing you want to do is cut a. Use it for your editorial calendar or for your family's schedule. This diy whiteboard couldn’t be easier to make. Here are 13 creative ways you can use your whiteboard calendar to maximize its potential: How to make a diy dry erase whiteboard calendar for cheap!hey guys!i hope you are doing well!i have been on the hunt for a large weekly. Since your phone is with you 24/7, it makes sense that this could end up happening. I like to have my weekend front and centre for me to see and then the rest of the week can appear in its. It’s effectively your 21 st century version of the whiteboard or paper family calendar that can be updated on the. Use a ruler to divide the board into individual days or weeks. Personally, i found myself relying on the app more than the digital calendar itself. Make your own whiteboard and custom calendar: Doodles and color inspired by @my.life.in.a.bullet link to the measurments: With appointments, meetings, and different happenings, it's so helpful to have one spot that everyone can check. How to make a diy dry erase whiteboard calendar for cheap!hey guys!i hope you are doing well!i have been on the hunt for a large weekly dry erase or whiteboa. All you do is design a perpetual calendar, frame one you already have or print the template that we used (which you can download here ) and then stick it. Make one for your family and give one as a gift! Personally, i found myself relying on the app more than the digital calendar itself. It’s about creating a personalized system that works for you, one that brings clarity, boosts productivity, and helps you stay on top of your game. A whiteboard calendar isn’t just about jotting down tasks and. Use it for your editorial calendar or for your family's schedule. Cut the plywood or mdf board to the desired size for your calendar. A whiteboard calendar isn’t just about jotting down tasks and deadlines. Making a whiteboard calendar with cricut is easy and fun! The first thing you want to do is cut a piece of vinyl. Create a template for your calendar. You can customize it however you want, from choosing different images or designs to putting together a unique color palette for each month on your calendar board! Use a ruler to divide the board into individual days or weeks. Follow this simple step by step tutorial to learn how to make a diy whiteboard. Want a custom dry erase calendar? Doodles and color inspired by @my.life.in.a.bullet link to the measurments: Use it for your editorial calendar or for your family's schedule. Cut the plywood or mdf board to the desired size for your calendar. Make your own whiteboard and custom calendar: Get the free 2021 calendar:. Our decorative dry erase calendar board uses a durable reinforced wood frame. Since your phone is with you 24/7, it makes sense that this could end up happening. Attach the whiteboard surface to the calendar base using a strong adhesive or screws. And it comes off easily, too! Here are some steps to get started: This whiteboard calendar is super simple to create and—i'm telling you—it has made juggling multiple freelance projects and editorial calendars much more manageable! Turn a regular dry erase board into your own personal diy whiteboard calendar and planner! Personally, i found myself relying on the app more than the digital calendar itself. Easy tutorial on how to make a whiteboard calendar for your home. This video tutorial will show you how to create a personalised whiteboard calendar using silhouette studio from how to create your file to how to piece your project together.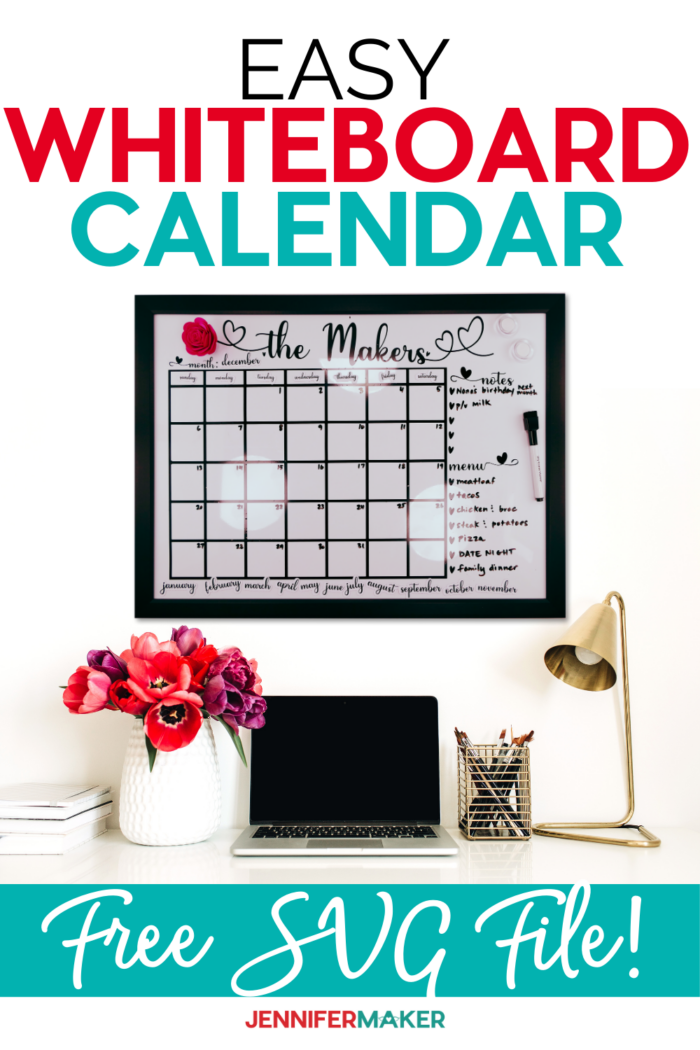
DIY Personalized Whiteboard Calendar with Print & Cut

Diy Whiteboard Calendar

Diy Whiteboard Calendar Ideas Printable And Enjoyable Learning

Diy Whiteboard Calendar Ideas Printable Word Searches

Diy Whiteboard Calendar Ideas Printable And Enjoyable Learning

Diy whiteboard calendar and planner Artofit
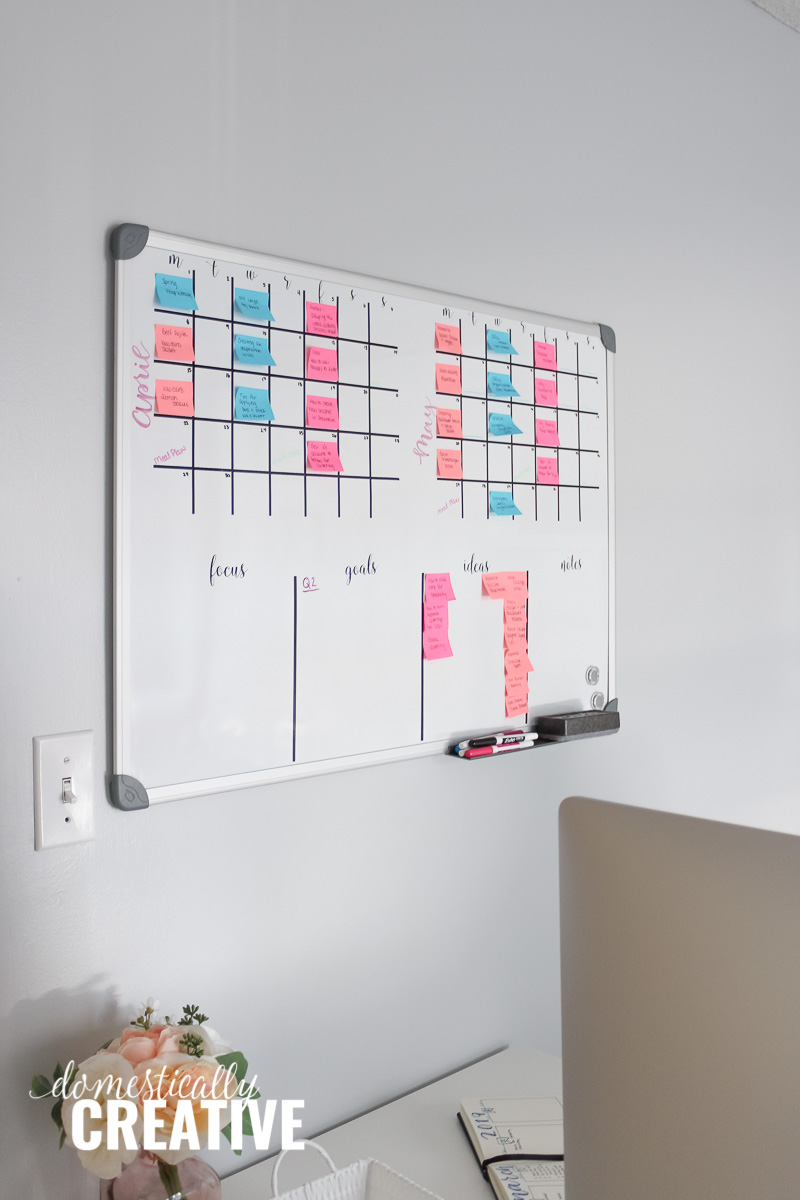
DIY Whiteboard Calendar and Planner Domestically Creative

DIY Whiteboard Calendar and Planner Domestically Creative
DIY Personalized Whiteboard Calendar with Print & Cut

Whiteboard Calendar Template Printable Word Searches
Create A Whiteboard Calendar With 6 Perfect Tips, Including Organization, Planning, And Scheduling, Using Markers, Stickers, And Colorful Designs To Boost Productivity And Time Management Skills With Customizable And Reusable Templates.
You Can Customize It However You Want, From Choosing Different Images Or Designs To Putting Together A Unique Color Palette For Each Month On Your Calendar Board!
Here Are 13 Creative Ways You Can Use Your Whiteboard Calendar To Maximize Its Potential:
Grab My Free 2021 Printable Calendar Template And Make This Easy Diy Whiteboard Calendar For Your Office Wall Or Family Command Centre!
Related Post: